TOPO Map Project
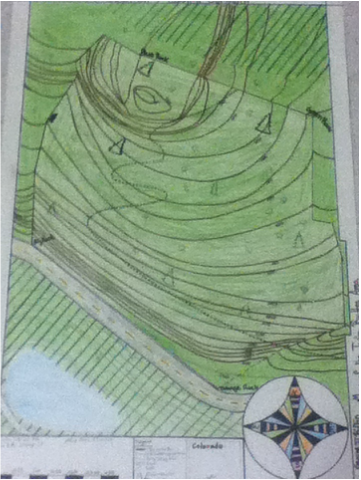
To Measure our bearings and paces in the field, we had one person who had a compass and used it to calculate the direction we were walking in from one landmark to the next around the perimeter of the mapping area. We had someone counting their strides between the points, we had the same person do that the whole time so that their were not different stride lengths. We also had someone marking waypoints on the GPS which tells you how high you are and exactly what your latitude longitude is, and they also wrote all of the information down. Once we had all of the information that we needed, we used it to create our map. We drew a compass so that we could point the protractor North every time. Then we placed the first point and used the protractor to find out which direction the coordanance of the next point were at, we used a scale so that one pace was a certain distance on the map and then once we had all of the points we just connected them to get the boundaries of the mapping area. we used Google Earth to plot our contour lines by flagging all of the landmarks on the map and then we put in the high and low points on the map and then from the low point added 5m and then traced what the perimeter looked like and then added another 5 and traced again until we had this topo map. contour lines are lines that join points of equal height above sea level, but their are also topo maps of the sea floor. These lines can be used to see what the terrain of a certain area looks like, a lot of times hikers use them to find routs up mountains. This project not only taught us how to use Google Earth to make a topographic map and how to use a GPS, but also taught us how to use compasses to navigate from one point to another which we can use throughout our whole lives and by the end of the project we all had a good idea of what the terrain looked like in the area that we mapped.
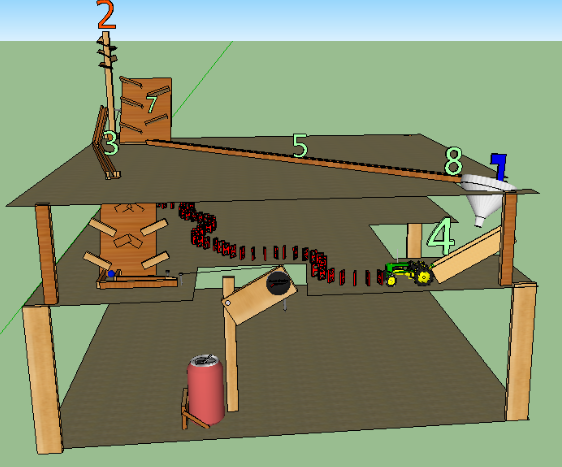
Rube Goldberg
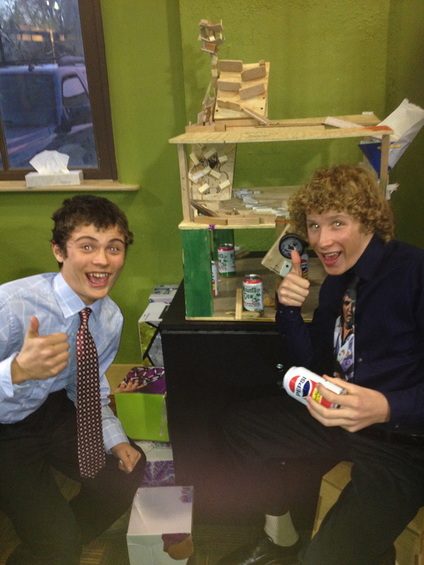
A Rube Goldberg Contraption is a chain reaction using symbol machines like levers and things like that completes a simple task. The requirements for our rube goldberg machines were that they had to run for at least 15 seconds and have 15 energy transfers, and at the end they had to complete a task our task was popping a soda can. It took us a very long time to make our Rube because we made almost all of the steps ourselves instead of using car traps and things like some people did. The exhibition was a lot of fun for our group because when he can poped the soda would shute our and spray the people watching which was funny, the other reason that the exhibition was a success was because our Rube ran all the way threw quite a few times.
Sketch Up
Calculations
1
Vertical Fall Rate
Distance divided by time
Time:
1. 1.13s
2. 1.45s
3. 1.45s
Ave=1.66s
Length of funnel=13cm
13cm/1.66s=7.70cm/s
Vertical fall rate= 9.70cm/s
2
Momentum
P=m*V
mass of marble= 0.00481kg
distance=44.5cm
time:
1. 1.61s
2. 1.65s
3. 1.72s
Ave=1.66s
Velocity=2.68cm/s=0.268m/s
P=0.00128908kg*m/s
3
Velocity m/s
Distance=40cm=0.40m
Time:
1. 1.10
2. 1.17
3. 1.16
ave= 1.14s
0.40m/1.14s
V=0.35m/s
4
Potential Energy
PE=mgh
mass of marble= 0.00481kg
hight= 0.095m
gravity= 9.8m/s2
PE= 0.0045 J
5
Kinetic Energy
KE=½ mv2
time:
1. 0.72
2. 0.65
3. 0.65
ave=0.64
length of ramp= 0.31m
V= 0.67
mass of marble=0.00481kg
KE=0.0108 J
6
Hangtime
t=√ root d/0.5g
distance= 0.3m
time= 2.5s
t=2.424
7
Conservation of Momentum
m1 v1 = m2 v2
weight one= 0.00506kg
weight two= 0.00369
velocity one=0.06m/s
V2=0.082m/s
8
Mechanical advantage
MA=Fr/Fe
di= 0.25m
do= 0.04m
MA= 6.25
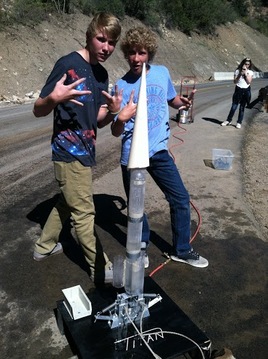
The Rocket Project
Rocket Log
Day 4, entry 1- Today we made the parachute for our rocket and attached it to the top of our rocket.
Day 5, entry 2- Today we finished our first rocket, I think that it will fly very high tomorrow at the test launch.
Day 6, entry 3- Yesterday we tested our first rocket, and it blew up after the second launch. The first launch the rocket went really high, but the chute didn't deploy so when it hit the ground it broke. Today we are going to start working on our second rocket.
Day 8, entry 4- Today we are going to glue our fins onto our second rocket, and hopefully finish it.
Day 9, entry 5- Today we our going to test launch our second rocket, I hope that the chute deploys this time.
Day 10, entry 6- Yesterday our we launched our new rocket. The firs launch went very well and the chute deployed. The rocket went super high for our next two launches, but the chute didn't deploy. Luckily the rocket turned on its side and slowly spiraled to the ground, so it didn't break.
Day 11, entry 7-Today we are going to spray paint our rocket , and prepare it for the test launch tomorrow. We named our rocket The Brown Momba.
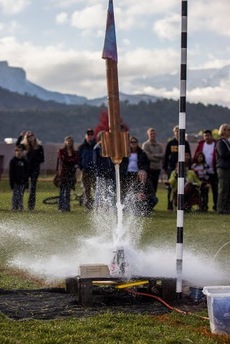
Day 12, entry 8- The Brown Momba went super high during todays test launch. It went super high and even though on the first two launches the chute didn't deploy, it didn't break. On our last launch it went so high that you could barley see it, and the chute deployed.
Day 5, entry 2- Today we finished our first rocket, I think that it will fly very high tomorrow at the test launch.
Day 6, entry 3- Yesterday we tested our first rocket, and it blew up after the second launch. The first launch the rocket went really high, but the chute didn't deploy so when it hit the ground it broke. Today we are going to start working on our second rocket.
Day 8, entry 4- Today we are going to glue our fins onto our second rocket, and hopefully finish it.
Day 9, entry 5- Today we our going to test launch our second rocket, I hope that the chute deploys this time.
Day 10, entry 6- Yesterday our we launched our new rocket. The firs launch went very well and the chute deployed. The rocket went super high for our next two launches, but the chute didn't deploy. Luckily the rocket turned on its side and slowly spiraled to the ground, so it didn't break.
Day 11, entry 7-Today we are going to spray paint our rocket , and prepare it for the test launch tomorrow. We named our rocket The Brown Momba.
Day 12, entry 8- The Brown Momba went super high during todays test launch. It went super high and even though on the first two launches the chute didn't deploy, it didn't break. On our last launch it went so high that you could barley see it, and the chute deployed.
Rocket Reflection
For me so far, the rocket project has been very fun and I have learned a lot about building a rocket. My partner Jimmy and I had to work very hard to finish our rocket in time. This is because the first rocket that we made broke after the first launch because the parachute didn't deploy and it hit the ground super hard. For the second rocket, the first part of the rocket that we built was the air chamber. We did this by cutting off one end of of two Smart water bottles and both ends of a third one. The next step was gluing them together where we took the bottle with both ends cut and glued it in between the other two with a special glue that can hold super high pressures. To the top of the chamber we attached a bottle with both ends cut off, not only to make the rocket taller but also to put the parachute in which we made out of a trash bag and fishing wire. The final step to making our rocket was attaching the fins. These were three bottles of the same size with the top and the bottom cut off and glued around the bottom of the rocket. We named him The Brown Momba.
We tested our rocket a number of times before we launched it. The first time that we tested it was really scary, especially after what happened to our first rocket. Another reason that we were scared was since we didn't spend a lot of time on the gluing we weren't sure it would hold pressure. But it did hold pressure and it went super high, so high that you almost couldn't see it. But then when it started to fall back to the ground the nose cone didn't come off and it started to nose dive towards the ground. But luckily at the last second the chute opened and it landed in a low tree. The next few test launches went great although the chute didn't open, it turned on its side and spiraled to the ground and the rocket was unharmed. The last test launch that we did was the best one yet, not only was it the highest but the chute opened. I was not there for the exhibition but from what everyone is saying it flew super high and the chute deployed. Our rocket set a hang time record and also beat all of the other rockets.
Data Table
Conclusion
At the exhibition the people stood 53m from the launch pad to measure the max angle that the rockets reach. The max angle on my rocket was 89 degrees according to the people that measured it, if it really was 89 degrees then the rocket would have gone 3036.4 m. I got this measurement by taking 53m and multiplied that by the tangent of 89 degrees. Next I calculated the average actual velocity, I did this by finding the total length of the whole trip 3036.4x2=6072.4 then we divided that by the flight time, 18.72 and got 324.4m/s. My actual flight time was 18.72. Then I had to calculate the theoretical flight time by taking the square route of the distance decided by one half the acceleration, we came up with 49.8s. To calculate the percent error we took the actual flight time subtracted the theoretical flight time, divided that by the theoretical flight time and then multiplied that by 100. I got 62.4 percent error. The reason that the percent error was so high, was because the people that calculated the angle measured our angle wrong. They made it way to high, and that is why all of our calculations are so outrageous.
